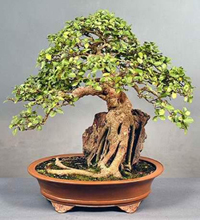
The Chinese Bonsai (Penjing) has much less strict rules and is a more philosophical and spiritual form of art than Japanese bonsai. Chinese and Japanese bonsai have their differences but are very closely related and are sometimes difficult to distinguish.
A high-quality Chinese bonsai composition has to look entirely natural. Although there is more freedom in Penjing, many of the general bonsai rules still apply.
To create a successful Chinese bonsai composition you need to know basic training techniques and be familiar with plant maintenance like re-potting, watering, feeding, etc.
After learning the main Chinese Bonsai Styles and rules you’ll have better control of your bonsai. It will make it easier for you to pick the right tree for your bonsai.
It is important to cultivate a feeling of balance when you are putting all the elements together. They should complement each other and express a natural look. In-depth observation of nature is a key to a successful Chinese bonsai. Often compared to poetry or paintings, Chinese bonsai art is a manifestation of Nature.
The chinese bonsai is really about your imagination. Balancing rules against innovation always creates a challenge. If you are a beginner, I would suggest following the rules. When you feel more comfortable start experimenting.
Trunk and Nebari Guidelines:
- Ensure the height of the tree is six times the caliper of its trunk.
- Slightly angle the trunk towards the viewer.
- The base of the trunk should have a flared appearance to visually anchor the plant.
- Arrange the roots to radiate from this flare.
- Avoid roots that extend directly towards the viewer.
- The apex of the tree should incline towards the viewer.
- Maintain a tapered trunk as it ascends without any reverse taper.
- Ensure grafts seamlessly match the understock and scion or are positioned low enough to blend into the nebari.
- Curves in the trunk should not result in a “pigeon breast” shape, with roundness facing the viewer.
- The apex should follow the direction set by the base to maintain a harmonious flow.
- Avoid trunk lines that curve backward on themselves, creating a “C” curve.
- For both formal and informal upright styles, position the apex directly over the base.
- In informal upright styles, limit the number of “S” curves to prevent visual exhaustion.
- As the tree ascends, space the curves closer together, considering branch placement.
- Each tree should feature only one apex.
- In twin tree trunks, the division should occur at the base rather than higher up.
Branch Guidelines:
- Prevent branches from crossing each other or the trunk.
- Avoid branches that directly point towards the viewer.
- Place the first branch at approximately one-third of the tree’s height.
- Subsequent branches should be spaced at one-third of the remaining distance to the top.
- Position branches on the outside of the curves, avoiding “belly branches.”
- Ensure branch caliper is proportionate to the trunk; branches thicker than one-third of the trunk’s caliper will appear too thick.
- Arrange the first branch to the left (or right), the second to the right (or left), and the third as the back branch.
- Alternate the placement of branches visually, avoiding parallel branches.
- Gradually reduce branch size and caliper as they ascend.
- Leave space between branches to create a natural appearance.
- The first and second branches (left and right) should be slightly forward of the midline to invite the viewer.
- Ensure that the first, second, and third branches are approximately 120 degrees apart, with the back branch not directly behind the tree.
- Allow only one branch per trunk position, avoiding “wheel and spoke” or opposite branches.
- Position branches to create an outline resembling a scalene triangle, with the apex representing God, the middle corner as man, and the lower corner as earth.
- Secondary branches should alternate left and right, adhering to the main branch placement rules, and should not move up or down to form a foliage pad.
- Wire branches down to create the illusion of an older tree; young trees have ascending branches, while the branches near the apex can be horizontal or ascending.
- In cascade styles, branches generally follow the same rules as upright styles, but the trunk moves downward.
- For twin trees, avoid branches between the trees that would cross the trunks, and use the outside branches to create a foliage triangle.
- Ensure that a jin (deadwood) is not hidden within the foliage.
Pot Guidelines:
- Position the tree behind the pot’s midline, to the left or right of the center line.
- For most cases, match the depth of the pot to the caliper of the trunk; exceptions apply to cascading styles.
- Use colored glazed pots for flowering and fruiting trees, with colors complementing the flower hues.
- The pot’s width should be two-thirds the height of the tree, or for very short trees, two-thirds the spread of the tree.
- Select a pot style that complements the tree’s characteristics; rectangular pots for upright trees with minimal movement, oval or round pots for informal uprights with more trunk movement, and deep rectangular pots for massive trees.
Cultural Practices:
- Use uniform soils without layering.
- Fertilize at full strength (though this may be subject to debate).
- Water from above rather than submerging the bonsai to prevent salt buildup.
- Increase humidity through methods like using a tray of pebbles and water or keeping the area under the bench wet, as opposed to misting.
- Remove most of the fine particles from the soil mix, using coarse particles.
- Water your plants based on their specific needs, not on a fixed schedule.
- Keep temperate climate plants outdoors, reserving indoor bonsai for tropical and subtropical varieties; temperate climate plants must experience an appropriate cold dormancy period if kept indoors.
